Showing posts with label InStyle Stamps. Show all posts

Friday, December 18, 2009

ISS - Love & Romance blog hop

Yes, I know, it's not the last Friday of the month, but this month InStyle Stamps is holding our blog hop a week early since we know everyone will be way too busy next Friday to blog hop. LOL.

The theme for this months blog hop is Love & Romance. If you've landed here from Jodi's blog than you are on the right track - continue on! If you've accidentally stumbled here on your own, take a moment go to the Instyle Stamps blog to start the hop off right. Trust me, you really don't want to miss any of the lovely projects the design team has in store for you! Be sure to visit each stop on the hop and leave a comment so we'll know you were here.


For my project today, I'll be showing you the soon-to-be-released digital image, Mitchel and Tiff. Aren't they sweet? I still needed to make a Christmas card for my hubby, and what could be more romantic than a Christmas kiss under the mistletoe?


Mitchel and Tiff were colored with Copic markers, and Tiff had a bit of eyeshadow added with a Sakura Stardust gelly roll pen. I used a Martha Stewart punch for the mistletoe, and went over it with Distressed Stickles in Peeled Paint. I kept the layout clean and simple since my hubby isn't a big fan of bling or frills. Think he'll like it?

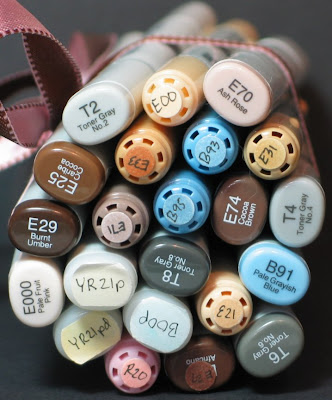
Copic markers used:


On to the Blog Hop details...

We will be giving away a Grand Prize to one lucky Blog Hop participant and also have a prize for one lucky design team member. To enter, finish hopping through the design team’s blogs, (leaving a comment at each stop, of course!) and then go to the InStyle Stamps blog and vote for the designer who's project inspired you the most. (You're going to vote for me, right? LOL!) Then, in order to be entered into the drawing to win the grand prize, leave us a comment on that post.

Thanks for playing along with us today! Next you will head to Joy's blog to see what she has in store for you! Thanks so much for stopping by! Happy Holidays!

Wednesday, December 2, 2009

InStyle Stamps guest designer call

It's time for the monthly Club Anime sketch challenge with InStyle Stamps, and this month, a spot on the guest design team for January and February is up for grabs! If you'd like to play along, head over to the Club Anime blog to check out all the details and get the sketch.


For my card, I took a break from all the holiday cards I've been working on lately to make a birthday card for a friend. I used Ava Sitting, one of my all time favorite images from InStyle Stamps, as the main image for my card.  Ava was colored with copic markers, and then I used Pearl Ex with Future Floor Wax to color in her wings. I just love the effect this gives you, and the way the floor wax seals in the Pearl Ex so it doesn't get all over everything. You can find a tutorial here if you aren't familiar with the technique.

Don't forget, you can save 5% off of your purchase at InStyle Stamps by following this link. Happy Shopping!

Friday, November 27, 2009

InStyle Stamps Blog Hop

It's the last Friday of the month, and you know what that means - it's time to go blog hopping with InStyle Stamps! The theme for this months blog-hop is Holiday Ornaments. If you've landed here from Raquel's blog than you are on the right track - continue on! If you've accidentally stumbled here on your own, take a moment go to the Instyle Stamps blog to start the hop off right. Trust me, you really don't want to miss any of the fabulous projects the design team has in store for you! Be sure to visit each stop on the hop and leave a comment so we'll know you stopped by.

I hope all my US readers had a wonderful Thanksgiving yesterday! Did you brave the cold and the crowds this morning to do some shopping on Black Friday? We normally do, but decided that sleeping in was a much better option this year. I don't know about you, but I'd rather shop in my pj's on the couch and avoid the crowds! LOL.


For my project for today, I created a double-sided ornament using the adorable Kimi. Double-sided, you ask, how'd she do that, you ask. Well, let me tell you. One of the benefits of digital stamps is that you can play with them with your photo editing program. I printed off one copy of Kimi as she comes, and then flipped the image so she was facing the other way and printed that off too. After coloring both images, I carefully cut them out and then glued the wrong sides together (sliding a piece of gold cord in the middle to make the hanger). Once the ornament was together, I added stickles to her wings (letting the one side dry before applying them to the other side, of course).


Kimi will be part of a friends Christmas gift this year, so I decided to make a card to hold her. I used  oval Nestabilities to cut a window in the front of the card and put a piece of acetate in between the layers.


Once I was finished decorating the card front, I used an exacto knife to cut a little oval in the back of the card to slide the ornament hanger through. A little bit of tape will hold it in place until my friend is ready to take Kimi off of the card and hang her on her tree.

On to the Blog Hop details...

We will be giving away a Grand Prize to one lucky Blog Hop participant and also have a prize for one lucky design team member. To enter, finish hopping through the design team’s blogs, (leaving a comment at each stop, of course!) and then go to the InStyle Stamps blog and vote for the designer who's project inspired you the most. (You're going to vote for me, right? LOL!) Then, in order to be entered into the drawing to win the grand prize, leave us a comment on that post.

Thanks for playing along with us today! Next you will head to Lysa's blog to see what she has in store for you! Thanks so much for stopping and good luck!

Sunday, November 15, 2009

Wishing you peace...


Meet Kimi, one of the adorable new holiday digital images by InStyle Stamps. Isn't she a cutie?


Kimi was colored with Copic markers (see photo below), and then had diamond Stickles added to her wings for a bit of sparkle. I dotted on a bit of gold Spica pen to her halo and sash as well for a little metallic shimmer. The pretty snowflakes are vellum coated with Twinklets Diamond Dust.

I'm doing quintuple duty with my card today. I made a holiday card using a digital image for this weeks Digital Tuesday Challenge, I've got glitter for Cute Card Thursday, coloring with gold for Copic Creations, I used the sketch by Friday Sketchers, and finally, the snow theme goes with InStyle Stamps Over-the-Hump Blog Candy Challenge. How's that for multi-tasking?!? LOL!

If you'd like to purchase Kimi, or any of the other adorable images from InStyle Stamps, click HERE to recieve a 5% discount on your purchase.

Markers used:

Monday, November 2, 2009

We've moved, and you get the house warming gifts!

InStyle Stamps has moved to blogger, and to celebrate our move, we have presents for you! The first 150 people to subscribe to the new InStyle Stamps blog by 6 pm, Monday, November 9th will be given a free digital image or free digital paper of their choice. You must subscribe by the time frame given and leave a comment on this post on the InStyle Stamps blog with your email address. So what are you waiting for? Go check it out!

Spread the Love blog hop for Jaimie

Welcome to the “Stamp Something…for Jaimie, Spreading the Love & Hope” blog hop. If you came here from Jaime Schlangen’s blog, then you are right on track. If not, then please start at the beginning of the hop at Katharina Frei’s blog.

Jaimie and her mother were the victims of a senseless crime that resulted in the death of Jaimie’s mother, Kimberly, and left Jaimie seriously injured. (See details below.) We want to flood Jaimie with love and well-wishes, and are asking everyone who reads this to take the time to join our special Card Drive Challenge and send Jaimie a card. We have generous sponsors who have kindly offered up some prizes to anyone who makes a card, posts it on their blogs, and lets us know they mailed it out.

A little about the cause of our hop:

On October 4, 4 teenagers armed with knives broke into a home in a small town in New Hampshire. Alone and sleeping inside were a mother and her 11 year old daughter. These 4 boys broke into this home with the intent to rob and kill anyone inside. They stabbed the mom, Kimberly Cates, to death and left her daughter, Jaimie, for dead in their driveway. It was a completely random act, their home was chosen only due to its secluded surroundings.

Our hope is that everyone hopping around today will stop for a moment and think about Jaimie and her father and what life must be like for them now. One moment in time has changed their lives forever. We are asking that everyone reading this message please take a moment to make a card and send it off to Jaimie. You can make something very simple or much more involved, but please share some words of hope and love and let her know that people do care and want the best for her. Please send your card to the address below:

Jaimie Cates
c/o Mont Vernon Fire Station
Main Street
Mont Vernon, NH 03057

The hop will run until Monday, November 9th, so you have a full week to participate and make a card for Jaimie. Once you’ve sent your card, pop on over to the Stamp Something…for Jaimie blog and leave us a comment for a chance to win some fabulous prizes generously donated by our sponsors.


For my card, I decided to use Vanessa, one of the adorable anime images by
InStyle Stamps. I had pj's just like this when I was a teen (mine were blue and red), so this image always brings back memories of slumber parties with my friends. You know, the ones where you pigged out on Mountain Dew and Doritos, and stayed up all night giggling over boys. Those were the days! LOL.


Jaimie's favorite colors are hot pink and black, so that determined the colors I used for my card. I colored Vanessa with copic markers (see bottom of the post for the colors) and then went over the LOVE on her pj's with a silver Spica pen for a little sparkle. (There is a close up below so you can see the sparkle better. It is really pretty IRL.)


My card layout is from the Club Anime sketch challenge for this week. Jaimie is not a girly-girl, so this layout was perfect for a non-fussy card. I just added a prima flower and some flat-backed gems for a little bling. I'm not sure of the brand of the patterned paper. It was in a stack of loose sheets a friend gave me a while back and the name slips my mind.


Now what are you waiting for? Head over to Erin Bai
ley's Blog to see what she has made especially for Jaimie.

Markers used:


**I noticed after I uploaded the photo that my RV02 marker was turned the wrong way, so that is the mystery pink ciao.

Friday, October 30, 2009

ISS Blog Hop - Set the Table

It's the last Friday of the month, and you know what that means - it's time to go blog hopping with InStyle Stamps! If you didn't come here from Lysa's blog, then you might want to go to the InStyle Stamps blog to start the hop so you don't miss any of the great projects the dt has in store for you!

Since Thanksgiving and Christmas are right around the corner, this month our theme is "Set the Table". And as usual, we will have some great prizes to give away, so make sure to read all the way down to the bottom of the post to see how you can get entered into a drawing for some great goodies!

For my project, I decided to use the adorable new Anime images, Virginia and William. Aren't they just the cutest little pilgrims?

Around here, "Setting the table" during the holidays always includes a pretty container of seasonal flowers. I decided that my pot of mums needed a little dressing up, so after coloring Virginia and William with my copic markers, I cut them out and used glue dots to attach them to a pair of chop sticks I had laying around (unused, honest!).

The mums came in one of those plain jane green plastic pots, so I rummaged through my collection of decorative pots and found this great tin basket. I added some green ribbon around it, and then used my nestabilities to make a cute flower for the sentiment.

The flower is very simple to make. Just use a scalloped circle nestie in a size to coordinate with your center circle, and snip in each scallop toward the center to make your "petals". The sentiment is computer-generated using one of my favorite fonts, Kayleigh. (Download it for free here.)

~~~~~~~~~~~~~~~~~~~~~~~~~~~~~~~~~

On to the Blog Hop details...

We will be giving away a Grand Prize to one lucky Blog Hop participant and also have a prize for one lucky design team member. To enter, hop through the design team’s blogs, (leaving a comment at each stop, of course!) and then go to the InStyle Stamps blog and vote for the designer who's project inspired you the most. (You're going to vote for me, right? LOL!) Then, in order to be entered into the drawing to win the grand prize, leave us a comment on that post.

I'm the last stop on your hop today, so now you'll want to go back to the InStyle Stamps blog to vote and enter the hop contest.

Thanks for playing along with us today!

Sunday, October 11, 2009

ISS Sneak Peek + Sketch Saturday #72

This weeks sketch on Sketch Saturday is a cute one, so I decided to play along. I flipped the sketch for my card as it worked better with my image, the adorable new anime from InStyle Stamps, Christmas Tree Chic.


I've always loved decorating our Christmas tree. Ok, I hate the grumbly "why won't these blasted lights work?!?" part, but putting on the ornaments is just so relaxing. I put on my favorite Christmas cd's and spend several happy hours putting each ornament in just the right spot.

Christmas Tree Chic was colored with copic markers as usual. The pretty designer paper is more of the My Mind's Eye Colorful Christmas line. The ornament embellishments were drawn by hand as I couldn't find a stamp the right size. The yummy crocheted ribbon is a Big Lot's find.

Copics used:

Saturday, October 10, 2009

Club Anime Color Challenge

It's time for another Color Challenge on Club Anime, and Virginia chose this yummy bedding as our inspiration piece this month:


Here's my take on the challenge:


Meet "Snowman Chic." Isn't she a cutie? She'll be available soon in the InStyle Stamps store, so keep an eye out! Snowman Chic was colored with copic markers (see photo at bottom) and then had SU Dazzlin' Diamonds added to the snowman for some sparkle.


I used Twinklets again on my vellum snowflake embellishment- told you I was addicted to the stuff! - but this time I experimented a bit by adding SU Dazzlin' Diamonds glitter on top of the Twinklets. You have GOT to try this - it is so sparkly and pretty! The photo just doesn't do it justice!

Now what are you waiting for? Go create something and then post a link on the Club Anime blog for a chance to win a great prize package. Not a member of Club Anime yet? Go here for info on how you can join.

Copics used:

Thanks for stopping by!

Thursday, October 1, 2009

CAS2 - Rockin' with Corrine

Today is sketch challenge day at Club Anime. If you're not currently a member of Club Anime, click here for all the details!

For my project, I decided to make a card for a co-workers granddaughter using the Club Anime image, Corrine.


Isn't she a cutie? Corrine was printed twice and colored with copic markers. After the images were colored, I carefully cut out Corrine and layered her on top of her stool with pop-dots to give the project more dimension. The cord for the headphones is a bit of silver cord that I attached with a glue pen. Once everything was together, I added a bit of diamond glaze to the headphones and iPod for a more realistic look.

Friday, September 25, 2009

Blog Hopping with InStyle Stamps

It's the last Friday of the month, and you know what that means - it's time to go blog hopping with InStyle Stamps! This month, the design team has been challenged to show you some Treats! And as usual, we will have some great prizes to give away, so make sure to read all the way down to the bottom of the post to see how you can get entered into a drawing for some great goodies!

For my project, I decided to use the adorable new Anime image, Patches. Isn't he a cutie?


My little nephew, Ryan, dressed up as a pumpkin for his first Halloween last year, so every time I see Patches, it makes me think of him (he's a cutie, too!).


I love using the Staples brand gel pens for work, and they come in clear plastic boxes that are just too nice to toss once the pens are gone. I re-purposed one into a treat container by making a new insert for it and tying a little ribbon around the outside. (Please excuse the slight waviness at the bottom of the box. The clear plastic kept picking up all kinds of reflections.)


Patches was colored with copic markers, and then layered using Rectangle & Scalloped Rectangle Nestabilities. The pretty orange polka-dotted background paper is from an ancient DCWV paper stack that I've had for 4+ years. Have I mentioned that I hoard paper? LOL!


For the back of the box, I downloaded Meltdown, a Halloween-appropriate font from dafont.com and printed off my sentiment. The center of each letter was colored in with a YR14 copic marker.

On to the Blog Hop details...

We will be giving away a Grand Prize to one lucky Blog Hop participant and also have a prize for one lucky design team member. To enter, hop through the design team’s blogs, (leaving a comment at each stop, of course!) and then go to the InStyle Stamps blog and vote for the designer who's project inspired you the most. (You're going to vote for me, right? LOL!) Then, in order to be entered into the drawing to win the grand prize, leave us a comment on that post answering the following question:

"What is your favorite fall treat?"

My favorite fall treat is fresh apple cider from The Cider Mill in Endicott, NY. Mmmm. If you are ever in the area, make sure to stop by to get a gallon of it. It is freshly squeezed, and is so much better than that stuff you can get at the grocery store.

Thanks for reading my ramblings. Now what are you waiting for? Get hopping!

Jennifer http://www.kiyomikrafts.com/
Jodi-Ann http://inkedinspirations.blogspot.com/
Joy http://daiseyfreak.blogspot.com/
Kim http://www.craftsbykim.blogspot.com/
Lysa http://lysaq.blogspot.com/
Mary http://mycardz.wordpress.com/
Maylee http://mayleescreativecorner.blogspot.com/
Piali http://touchofcreation.blogspot.com/
Raquel http://raqode7.blogspot.com/

Wednesday, September 16, 2009

CD Sleeve tutorial, and a chance to win...

I thought you might like a peek at one of the 3 cd cases you can win as part of the InStyle Stamps Over the Hump candy I mentioned earlier today. Be sure to pop over to the InStyle Stamps blog to see the two other cute designs that are up for grabs, and of course, to enter to win.

Now on to the instructions...

Easy Peasy CD Sleeve

*See template for visuals.*

-Cut a piece of 10x6 card stock.
-Score down the middle of the 10 inch side.
-Rotate the paper, and score in 1/2 an inch on each end of the 6 inch side of the paper.
-Cut out the 1/2 inch tabs on one side of the paper as shown, and dispose of them.
-Fold the paper in half on the 5 inch score line and punch out the half oval with a circle punch. This is optional, but it makes it easier to get your cd out of the finished project.
-Fold in your 1/2 inch tabs on each side and glue in place.
-Decorate as desired.

Told you it was easy!

Over the Hump Day Candy with InStyle Stamps

Hello all! Sorry for the lack of posts recently. We are doing a little basement remodeling and it has been eating up all my crafting time.

Are you ready for Over the Hump Day? We're half way through the week AND half way through the month, so InStyle Stamps is celebrating with a little candy.

This month we are giving away 3 custom cd cases that contain 5 Journal Cynthia images printed on Neenah paper for you to color and a CD filled with InStyle Stamps Non-Anime Images. That's over 80 images, absolutely free...just for creating a project!!! How great is that!?! Be sure to pop on over to the InStyle Stamps blog for all the details on how you can be entered to win.

Now on to the project:

My sister has the most fabulous spa tub in the master bath of her new house. When I was visiting a few months ago, she let me indulge in a nice long soak. Aah. It was dreamy! But one thing was missing - nice relaxing music. (Val, don't scroll any farther if you are reading this - it'll spoil your stocking stuffer!) I'm trying to get a head start on my Christmas gifts, so, since I have a hubby with a gigantic music collection, I decided to make her a custom mix to listen to as she unwinds from a stressful day with the kiddos.


I printed Asia from Club Anime on Neenah cardstock, and colored her in with copic markers. I have to share that this was my first time using Neenah. I normally use Georgia Pacific, and let me tell you, coloring on the Neenah blows the GP out of the water! My ink went on so easily, the colors blended without having to go over and over everything like I do with the GP, and best of all, the markers didn't bleed at all! I'm hooked!

Tuesday, September 1, 2009

Club Anime Sketch Challenge

Today is the first ever Club Anime sketch challenge. If you're not currently a member of Club Anime, click here for all the details!

For my project, I decided to make a cute little gift holder using Jules and the delish Bo Bunny papers from the Club Anime September kit. Isn't she adorable?

Make sure to check out the Club Anime blog for more photos, project instructions, and to find out what's inside the package! You'll be glad you did!

Friday, August 28, 2009

Blog Hoppin' with InStyle Stamps

It's the last Friday of the month, and you know what that means - it's time to go blog hopping InStyle Stamps! Our theme for this month is Back-to-School, and of course, we have some fabulous new images to help you celebrate getting the little munchkins out from under your feet! As usual, we will have some great prizes to give away, so make sure to read all the way down to the bottom of the post to see how you can get entered into a drawing for some great goodies!

For my project, I made a cute little backpack for a co-worker with two children who will be returning to school soon.
You can find the pattern for the backpack here. I used Circles and Posies and pink gingham (coming soon!!!) digital paper for my pack. Isn't it pretty? Here's a side view so you can see the ribbon "straps".


Now, what's a backpack without something to go in it? Whe
n I was in grade school, my mother would always tuck little notes into my lunch box, so I've included four little 3x3 notes inside the backpack for her to use for her children.


I used Janice and Jacob, and the soon to be released school house for her cards. Aren't they cute? I hope she likes them!

On to the blog hop details...

We will be giving away a Grand Prize to one lucky Blog Hop participant and also have a prize for one lucky design team member. To enter, hop through the design team’s blogs (you can find them in my sidebar), and then go to the InStyle Stamps blog and vote for the designer who's project inspired you the most. (You're going to vote for me, right? LOL!) The leave us a comment on that post in order to be entered into the drawing for the grand prize.

Saturday, August 1, 2009

Copic Creations Challenge #9 - Coloring Eyes


I have exciting news to share! I've been invited to be the guest designer for today's challenge on the Copic Creations Challenge Blog, which will feature my eye coloring tutorial (see previous post)! I feel very honored to be invited to join these amazingly talented ladies!

This week's challenge is to use your Copic markers to color eyes, and is sponsored by InStyle Stamps.

For my card, I used the digi version of Mellie by InStyle Stamps. Using the digi version allowed me to enlarge the image to show off those gorgeous eyes. I also used my photo editing program to mirror the image so that Mellie is holding her cake the right way to work with the layout I wanted to use. Try doing that with a traditional stamp!


I printed two copies of Mellie, and used just the jacket and the cake from the second image to give the card a 3D effect. The shoulders are attached to the main image with a dab of 2-way glue, and then the arms are popped up on a foam dot to make it appear that Mellie is holding the cake out for the birthday girl to blow out the candles. The yummy chocolate cake was given white Liquid Applique frosting, and then I added a touch of star dust Stickles on the platter and the candle flames for a bit of sparkle.


Thanks for stopping by! Be sure to go check out the lovely creations by the amazing Design Team at the Copic Creations Challenge blog. If you’re new to Copics, or just want some pointers, you’ll love all the Copic tutorials that can be found there.

Copics used: RV93, RV91, G40, G82, G85, E00, E0000, YR21, E 25, E27, E29, E33, R20, R81, and a custom mixed pale R81

Eye colors: G85, G82, G40

Friday, July 31, 2009

How to Color Anime Eyes, a Copic Tutorial

One of the things that make anime stamps so appealing is their large, soulful eyes. When InStyle Stamps was preparing to release our line of Anime stamps back in January, I browsed the web and looked at tons of anime images to determine just the right way to color the eyes to show them to their best advantage. I made a little tutorial for our design team, which I am now going to share with you.

For my tutorial, I printed off a card front sized version of the digi image, Lizzie, from InStyle Stamps. (Note Lizzie is also available in red rubber for those of you who haven't jumped on the digital bandwagon.)


Step One
When coloring in the face, leave a white area around the eye going from the tip of the eyelash to the line under the eye as shown. In my sample, E00 is used to color in the face.


Step Two
The eyes are going to be colored in layers. Pick 3 shades of marker, a dark, a medium, and a light. I used my darkest blue, BG05 to lay down my first ring of color.


Step Three
Now add in a second layer of color in a lighter shade than the first, in this case BG01. Go over the BG05 color layer with the BG01 marker to start blending the two colors together. Notice that while there is some definite blending where they overlap, each color is still distinct.


Step Four
Add in your lightest color, BG000 in the sample, for your third layer of color. You will again go over the previous layers of color to blend. Leave a small area at the bottom of the eye uncolored. This adds depth by showing where the light is hitting the eye.


Step Five
Add a layer of the lightest color, in this case BG000, to the ring at the top of the eye where light is being reflected.


Finished Eye


See how easy it is to get a fabulous looking eye? Now what are you waiting for, whip out those Copics, and get coloring!

InStyle Stamps Fantasy Blog Hop

It's the last Friday of the month, and you know what that means - it's time to go blog hopping with InStyle Stamps! This month, the design team was given an image from our new fantasy line, debuting today! As usual, we will have some great prizes to give away, so make sure to read all the way down to the bottom of the post to see how you can get entered into a drawing for some great goodies!

When Virginia showed me the new images, I knew I had to work with the adorable new Twirling Fairy image. She is just so cute!


For my blog hop project, I decided to make a birthday card with matching wrapped gift for a friend who's is celebrating the big 40 next week. Think she'll like it?


Matching wrapped gift, you say? How did you do that, you say? Well let me let you in on a little secret... not only is digital paper great for cards and scrapbooks, but it makes great custom gift wrap!

For my gift wrap, I printed the White Circles and Posies digi paper onto copy paper. Yup, you read that correctly, plain old copy paper.


I then added on ribbon, lace, and a pink button to match my card. See how quick and easy it is to add a personal touch to your wrappings?


For the card, I colored in Twirling Fairy with copic markers and added some highlights with my trusty white gel pen. I don't know about you, but when I think of fairies, I picture gauzy dresses made out of some gorgeous shimmering fabric, so I went over the image with Angel Wings Shimmerz to try to recreate that effect.


As you can see, the designer paper is more of the White Circles and Posies digi paper, this time printed onto cardstock. I used the ribbon and lace from the gift wrap, and added in two pink buttons in a smaller size so everything coordinates.

~~~~~~~~~~~~~~~~~~~~~~~~~~~~~~~~~~~~~~~~~~~~~~~~~~

On to the blog hop details...

We will be giving away a Grand Prize to one lucky Blog Hop participant and also have a prize for one lucky design team member. To enter, hop through the design team’s blogs (you can find them in my sidebar), and then go to the InStyle Stamps blog and vote for the designer who's project inspired you the most. (You're going to vote for me, right? LOL!) The leave us a comment answering the following question in order to be entered into the drawing for the grand prize:

What is your favorite fairytale? (Now or as a child.)

My favorite fairytale has always been Sleeping Beauty. I saw the Disney movie as a child and was enchanted. The amazing music and the funny antics of the 3 Fairy Godmothers sucked me right in. "Make it Blue." "I said Pink!" LOL. I've read many other versions of the tale (Robin McKinley's "Spindle's End" is an entertaining romp with a less helpless heroine.) over the years, but the Disney movie version remains a favorite.

Related Posts with Thumbnails
 
Blog design and header created by Melissa Earnest.
Background paper by Pink Petticoat.