Baby Ryan arrived late Friday night, and both mommy and baby are doing well. Unlucky me has come down with a nasty cold, so I am not able to go see him yet. Waa!!! My mother was nice enough to send me some photos, and let me tell you, he's a cutey!
So that was happy news #1, are you ready for happy news #2?
The scrapbook page I mentioned in my previous post did double duty as my entry for the Silly Monkey Crafts design team call. And.... I am one of 18 ladies who will be moving on to round 2 of the call! I'm so excited!
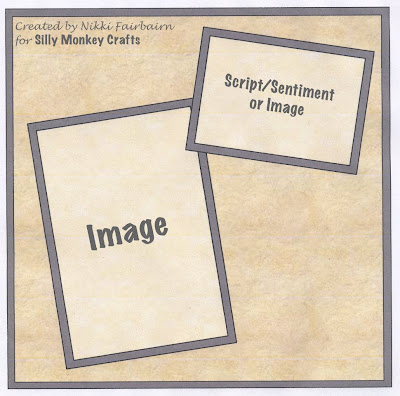
For round 1, you had to make a project using this layout provided by Nikki:
I decided to use the layout to make the first page of the scrapbook album I am putting together for Ryan.
I've been saving the adorable image from hÄnglar & stÄnglar for projects for Ryan, but hadn't found the right one to use it on yet. When I saw this sketch a light bulb went on and I knew exactly what I wanted to do with it. I liked the end result so much that I flipped the sketch a bit and used it for the wall art in my previous post.
Sunday, September 28, 2008
Happy News x 2!
Thursday, September 25, 2008
wall art for baby Ryan
 As some of you may know, my brother is expecting his first child this month. I just got the call that my SIL will be induced tomorrow, so baby Ryan will be here VERY soon! I'm so excited!!!
I've been very busy making a scrapbook for him, and took some time off from that to make a piece of wall art for his nursery. The happy parents-to-be decided on a star and moon theme with a lovely aqua color on the wall, so that was my starting point for this piece.
Don't you just love the adorable boy on the moon image by hÄnglar & stÄnglar? I fell in love with it the minute I saw it and was really bummed because they don't sell to the US. One of my SCS piffing friends heard my plight and was sweet enough to send me a few stamped images for my projects for Ryan. Thank you Cal Bear Stamper!!! You're the greatest!!!
The image was colored in with Copic makers, and placed on pop-dots to add depth to the project. The three stars on the side were hand drawn to match the one the boy has on a string. I thought they needed a little something more, so I dug through my jewelry making supplies for the wire and beads for the "tails". You can't really tell from the photo, but I bent the "tails" up a bit so they really pop out at you. "Ryan" was printed on the computer since I am sadly lacking in alphabet stamps. I can't remember the brand of the designer papers I used, but I purchased them all at Joann Fabrics. I love the pretty green stitched paper and will have to go back for more for my stash.
I had the hardest time photographing this, so please excuse the slightly off-center photo. I kept getting glare on the glass of the shadowbox frame, and this was the only angle that worked.
This project was inspired by a page I made for Ryan's scrapbook. I will post it in the near future...
Sunday, September 21, 2008
a little hello...
My birthday was at the beginning of September, and not only did DH get me some Copics, but I used my birthday money from family to purchase more. (check out www.oozak.com for the best prices) As a result, I've been on a bit of a Copic craze lately, and have been coloring like mad to try out my new markers. Here's my latest project:
I haven't done a pop-up card in a while, and thought that "Tilda throwing hearts" would be perfect for one. After coloring Tilda with Copics, I  added a bit of accent with a white gel pen. It doesn't show up to well in the photo, but I also added some stickles to her wings and the lace on her dress and apron.
For the center piece, I used a sponge to apply some SU Soft Sky ink to the background. I then added the tree from Olivia's Birdies and some grass from Scenery Set (both by CC Design stamps), and colored them in with, drum roll please, Copics. (You saw that one coming, right?) ;) The Copics go right over the sponged background without any of the color distortion you would get with water based markers. Gotta love it!
Copic tidbit: Did you know that you can use your Copics to make custom colored brads and eyelets for your projects? Neat, huh? I didn't have any eyelets in an appropriate color for this project, so I used a pink Copic (RV10) to get the exact shade that I needed to match Tilda's dress.
You can find the instructions for free standing pop-up cards on SCS here. I know they look complicated, but trust me, these are actually pretty easy to put together. Just make sure you use a super-strong adhesive like Provo Crafts Terrifically Tacky Tape to stick the center pieces that form the base together or it might not hold up very well.
My sister has a thing for hearts, so this card will probably go to her. Shhh... don't tell her!
Saturday, September 20, 2008
Whiff of Joy DT call / Anniversary card...
 Katharina of Whiff of Joy is holding a call for a guest designer (see details here) and I wanted to enter since I just love her stamps! I knew I still needed to make an anniversary card for DH, so I decided to kill two birds with one card, ahem, stone. :)
I looked through all of the great sketches Katharina has posted on her blog, and knew I had to play with this one as soon as I saw it. However, the long oval didn't really work for what I had in mind, so I rotated the layout 90 degrees for my card.
I purchased this adorable Lily & Milo hand in hand stamp a while back, intending to use it for my anniversary card for DH. We used to go walking for hours when we were first dating, so it just seemed perfect. The image was colored in with Copic markers, and then highlighted here and there with a white gel pen.  The gorgeous designer papers on this card are all from a 6x6 pad of Basic Grey Infuse. I love this paper, and am kicking myself that I didn't buy a second pad of it when I had the chance. *sigh* I've been hoarding it since it is so pretty, but DH is worth the good stuff, right? LOL!
The "I want to hold your hand" sentiment is from Feeling Groovy by Verve Stamps. DH is a BIG time Beatles fan, so in addition to being perfect for the image on this card, the sentiment had personal meaning for him. The set has several other sentiments from Beatles songs, so I knew I had to buy it as soon as I saw it.
The oval and matching scallop were cut using my Cuttlebug and Nestabilities dies, and the scalloped edges are the new SU punch. I finished off the card with a few Prima flowers with Bella's Baubles for centers, and a piece of the yummy new SU Riding Hood Red taffeta ribbon.
*side note* DH really seemed to like the card, and commented that the colored image looked like something you'd see in a quality children's book. That was a compliment, right? LOL! He then went on to note that I really seem to like those cute people images lately. If he only knew! Good thing he doesn't check out my stamp room very often!
*disclaimer* I apologize that the photo isn't as true-to-life as it could be. The bulb in the true color lamp I use for taking photos blew, and I haven't had a chance to get to the store for a new one.
Blog Candy Alert!
Are you drooling over the Whiff of Joy stamps like I am? Well then, you will wan to know that Bev at All the Things I Love has some great blog candy to give away. Check her out!
Chrissy at Creating with Chrissy is giving away a fabulous stamp set for her blog candy to celebrate 40,000 hits on her blog. You go girl!
Beth at Beth's Little Card Blog is celebrating her 200th post with some fabulous blog candy. Gotta love those bears!
Carole at StarDust Gems and Ribbons is also having a fabulous blog candy give away with a Magnolia Tilda stamp and lots of other goodies. Click here for more details.
Monday, September 15, 2008
grab life by the handlebars
 As promised, here is the card I made for my brother's birthday. He loves motorcycles, so when I saw this set from Artful Inkables, I just had to get it.
The bike was water colored using an aquapainter and SU markers, and then I went over it with a Sakura stardust pen to get that nice metallic sparkle.
Monday, September 8, 2008
Blog candy alert!
Carmen is celebrating 20,000 blog visits with some great blog candy! Make sure to check it out and take a gander at her projects while you are at it. http://carmens-ecke.blogspot.com/
Sorry I haven't posted in a while. End of summer projects and 2 birthdays (one of which was mine!) have been keeping me busy. I'll be back later with a guy card made especially for my brother's birthday.
Saturday, August 23, 2008
Mojo Monday #49
 I decided to try out the Mojo Monday sketch challenge hosted by Julee of Verve stamps on her blog, Poetic Artistry. I don't do sketch challenges very often as I find needing to work off a particular layout tends to block my creativity and I spend way longer on a card than I would if I was just designing from scratch, but I really liked this sketch and had an idea for it almost immediately. (Though I have to admit that it still took me 2+ hours to finish this card. I could decide what colors I liked best for the flowers and kept trying out different color combinations...)
As I mentioned previously, I was one of the lucky winners of Beautiful You at the Verve anniversary party. My set arrived yesterday (THANK YOU, JULEE!!!), so of course I had to use the flower from it for this sketch. The sentiment is from another Verve stamp set, Feeling Groovy. For the center panel, I stamp the flower in the center, and then stamped it again in each corner. The petals were colored in with Copic markers (I used R89 and RV10.). I then cut out the center flower, covered the RV10 with pink stickles and set it aside to dry. The two sides were matted onto a piece of black cs, with extra room in the middle so that when I put the flower back in the center (using a pop dot) it left a nice black boarder around it.
I did a lot of embossing with my cuttlebug for this card. The small white dots at the top are the Swiss Dots folder, the large at the bottom are the new Just My Type folder, and the red was done using the Birds and Swirls folder. I didn't have red cs that was an exact match for the color I used in the image, so I sponged some Purely Pomegranate ink onto the red after it went through the cuttlebug to darken it up a bit.
After the card was assembled, I decided it need just a little something more, so I went digging through my cross stitch supplies. I found pretty little beads from Mill Hill, and used them for the center of the flower, and to make little berries on the red cs.
This was actually a very frustrating card to photograph. For some reason, the pink is coming out much darker than it is in real life, and the red isn't as vibrant. *sigh*
Tuesday, August 19, 2008
office birthday
I think I have mentioned before that I am the official birthday card maker for my office. We have 2 birthdays in August, so I've been a busy girl. You can see the August birthday girl's card in the previous post. I also needed a card for the August birthday boy, and as you all know, guy cards are some of the hardest to make. What do you think of mine? The birthday boy in question loves animals. He has multiple cats, a dog, a snake, fish, and I forget what else, but trust me, he has a lot of pets. I thought Attitudy Cats from Stamping Bella would make a purrfect card for him. The cats bring to mind his pets, but could also be his office mates wishing him a happy birthday. Do you like their hats? I let you in on a little secret... they were originally Christmas trees from the retired SU set, Crazy for Christmas.
The cats were colored with an aquapainter and SU's watercolor crayons, and the hats used the aquapainter with some ink picked up from the lids of the new SU in colors. The image was then layered on SU Kiwi Kiss and Pacific Point. The embossing is a piece of SU Baja Breeze which was ran through my Cuttlebug. The speckled background was created with the SU color spritzer tool and markers.
For the sentiment, I used a stamp from Vivas Las Vegas Stamps. I masked off the "It's your birthday!" for the front, and then used the rest of the sentiment for the inside of the card. I forgot to take a picture of the inside, but the rest of the sentiment says: "Demand attention. Expect to be waited on. Don't do anything you don't want to do. In other words, party like a cat!" LOL! Gotta love it!
Saturday, August 16, 2008
Tier of Treats
 Mmmm. Looking at this card makes me want to go to the local bakery for something scrumptious! Too bad it is late, and the bakery is closed, eh?
I just love this image - Tier of Treats from Stampendous. I don't actually own the stamp (hint, hint, birthday fairy...) but was lucky enough to get some stamped images from the PIF Image thread on SCS. Check it out if you haven't already, though I will warn you, it will expose you to all kinds of new stamps that you will then want to own! LOL!
I used an aquapainter with my SU Chocolate Chip, Riding Hood Red, Pink Pirouette, and Kiwi Kiss ink pads to color in the image. The platters and stand wire were colored in with a stardust gellyroll pen to give it that metallic sheen. I used liquid applique on the treats to make frosting. I only own white liquid applique, so I mixed a little ink into it while it was still wet to get the pink and brown frosting. Once it was dry, I added some stickles to the frosting and the cherries for a little sparkle.
The card stock is SU Chocolate Chip and Pink Pirouette (my new favorite). The pretty ribbon is from Papertrey Ink, and almost perfectly matches the SU Pink Pirouette paper. The white was embossed using the Swiss Dots Cuttlebug folder. I've been giving it a work out since it arrived! I think it is my new favorite!


